Before and After TV Cabinet

My home seems to be ever changing. Especially when you find a great bargain like this TV Cabinet for $20!

Before and After

It was a black wood grain veneer with silver handles, that had fallen out in some places.

A few coats of white paint later and some new handles from Ikea and it was a perfect fit in our little home… almost…

We ended up rearranging all our furniture as it was too big to fit where we used to have out TV. This turned out to be a blessing in disguise as we love our new home configuration.

Special thanks to my husband who did most of the painting!


Tv Cabinet_Corner Tv Cabinet_Side

TV Cabinet (6)

A Few Of My Favourite Things

We are well and truly into this year now but I have a few of my favorite things from Christmas to share with you. They make me love my home even more.

1. Red throw rug from House and Garden

20140226-123555.jpg

20140226-123625.jpg

2. Vase from House & Garden. Perfect for my fake flowers 😉20140226-123926.jpg

3. Antique Key Hook from Urban Outfitters. A similar one is available here20140226-123947.jpg

4. String on holder with scissors (a present from New Zealand)20140226-123917.jpg

My Turquoise Chair

About a year ago I found this cute little chair on the side of the road in hard rubbish.
A year later I finally fixed it up to add to my mismatched dinning chairs.
Well actually I didn’t do much of the work. My sister-in-law wanted to use it at her wedding, so my parents, my sister-in-law and her mum are the ones really responsible.
The old seat was looking pretty gross and the chair was missing a few bits and had to be taken apart and glued back together.
While apart I sanded it down so that the paint would grip to the wood better.

20140208-130523.jpg20140208-130555.jpg

Once glued back together it was painted turquoise (a colour I’ve been adding into my house bit by bit lately) and rubbed back to reveal some of the wood and white undercoat – for that rustic look.

The seat was covered in some hessian, which was originally a temporary solution for the wedding and then I could decide what I wanted to use later. I really like the hessian though, so I’m keeping it 🙂

Here it is!

Turquoise Chair20140208-130609.jpg

You can only just see it down towards the end but here’s the chair at the wedding on the long tables which had random mismatched chairs mixed in.20140208-130937.jpg

And this is what it looks like around our dining table. Love it!

20140208-131352.jpg

20140208-131422.jpg

Milk Bottles – 5 ways to use them at home

For Christmas I was given a set of little milk bottles – how cute! But what exactly to do with them?

Here are a few ideas.

1. Christmas Decorations

Milk Bottles Christmas DecorationSource: Miss Sew & So..

2. Vases

Milk Bottle VasesSource: Baileys Home and Garden

I’ve used one as a vase on my coffee table tray.

Milk Bottle Vase

3. Paint Dipped Vases (for something extra special)

Paint Dipped Milk BottlesSource: Say Yes To Hoboken

4. Drinks at a party

I think I might do this one for New Years Eve to go with my fruit punch!

Milk Bottles StrawsSource: Wed Society

5. General Decor

With a bit of string, hessian or lace tied around them they look great anywhere in the home.

Mine came with some black stick on labels and a white pen so here’s what I came up with –

Crates and Milk Bottles Faith Hope and Love Milk Bottles Decor Faith Hope & Love

Update

Well it’s been a while since I last blogged. Life has been busy; work, weddings, Christmas. I’ve also been busy updating some things in our home.

A few months back we bought a new sofa. It’s a Kaslstad sofa bed from Ikea and matching footstool. Of course along with this I also needed to buy some new cushions and a new rug 🙂

Here’s a reminder of how it was before.

20130716-172407.jpg 20130716-172442.jpg

So here’s an update of what our little home looks like now! I love the changes, especially the touch of turquoise.. more of that to come.

Home1 Home2 Home3 Home4 Home5


6 Ways To Use Wooden Crates

Wooden crates have so many uses and can be a clever feature item in your home.

Here’s 6 different ways you can use them.

1. Keep your cushions and throws next to the couch

9367945247f1bc4769fe7b7be4f7c0ee

Source: ext.homedepot.com (Check this out to see how to customise your own wooden storage crate)

2. Display Shelving

A few years ago a friend and I found a bunch of old wooden fruit crates on the side of the road (during hard rubbish collection) and grabbed 3 each!

I immediately found a place to set mine up at home and used it like display boxes/shelves, with ornaments and magazines stored inside and on top.

This is the set up at our old home  IMG_8613

3. Sneaky Storage

When we moved to our granny flat I knew I had limited space but keeping my crates was a must for me!

I found both decorative and practical ways to incorporate them into our new living space. 2 are on top of each other as decorative display similar to before, and the other is a convenient cleaning storage box. As you can see below, it is up against the bookshelf and wall with our Enjo floor cleaner and dust pan & brush inside.

Crates20130731-214827.jpg

As you can image there’s not a lot of space in our granny flat so finding sneaky storage solutions was essential. Another crate that I bought at an op shop stores our vacuum cleaner neatly under this table.

20130731-214617.jpg 20130731-214605.jpg

4. Mounted to the wall

A more permanent display shelving solution. Looks great.

Future-and-Found-116A-Fortress-Road-Tufnell-Park-London-NW5-2HP-Image-by-Sound-Patrol1

Source: Home Girl London

5. Use them with an old window to create a rustic coffee table

Say what??

Maybe not a common use but I love the creativity of this idea.

Living-Room-49

Source: Home Design Board

6. Bedside Table

51b0887174c5b675b0000c0f._w.540_s.fit_

Source:  Apartment Therapy

Home Sweet Home Pt 2

So in my last post, which just so happened to be my first post, I showed the building development of our current little ‘granny flat’ home.

Well here it is with furniture & decor and with curtains and blinds installed.

I would love to change a few things (ie new couch & other dining chairs so its even more mismatched) but this is working with what I’ve got. And it’s home 🙂

Through my early twenties I was very into sleek simple modern & contemporary styles but over the years this has evolved into an eclectic mix of this with vintage/country/rustic/provincial. I also like red… can you tell??

20130716-173020.jpg

20130716-173050.jpg

The bookcase below was found on the side of the road in hard rubbish collection. I painted it white, and grey on the back panel. The shelves are fixed so this proved an interesting task using a lot of masking tape. I just wish I’d taken before and after photos, but didn’t know I was going to blog about it then! The damask dining chair covers & whitewash cupboard where also DIY projects, done by my mum, and I wish I had before shots of those too.

My Home 1

20130716-173142.jpg

20130716-173153.jpg

20130722-192117.jpg

I’ll tell you more about the kitchen some other time.

Home Sweet Home Pt 1

I thought it would be best to start with more about me and my current home.

I’m from Adelaide, Australia and I’m currently studying (almost finished) an interior design course.

I want to use this blog for interior design inspiration – styles I love, projects I’ve worked on and my own home.

My husband and I got married in December 2010 and on returning from our honeymoon, we headed to a rental property. It was great rent and a large house, a great first home – I’ll show you a few photos another time.

Just over a year ago we moved out to house sit for my parent’s in law for 6 months while they were overseas.. which meant no rent to pay woohoo! But trying to find a new place to rent after this time and get a deal as good as we had, was not looking good.

So my parents in law gave us another great opportunity! They rebuilt their old garage, which had been used as a bedroom for some time, and turned it into a living space for us, complete with kitchen and bathroom! Our bedroom is in the main house but with a back door and very close to our ‘granny flat.’

This is giving us the opportunity to save what would be our rent money, for a house deposit. So hopefully in the not to distant future I’ll be showing you pictures of our very own home but for now this is the closest thing. I got to be involved in choosing paint colours and designing the Ikea kitchen as well as a few other bits and pieces which was great fun!

So 2 days before Christmas 2012 we finally moved in (after months of builder’s promises that it would be ready sooner).

Here’s our pictures of the building progress. Unfortunately I can’t find a proper before picture, although I was sure I took some.

Framework going up, walls being changed & windows going in.Part 1 - framework etc (4) Part 1 - framework etc (7)

Plasterboard up.. looking better already!Part 2 - Walls (2)

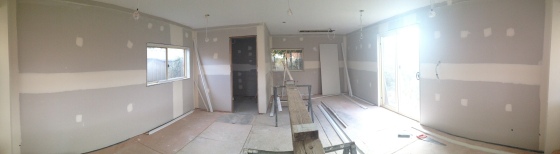
Just needs a few coats of paint.Part 3 - Painting & bathroom tiles (1)

Bathroom Tiles20130717-095606.jpg

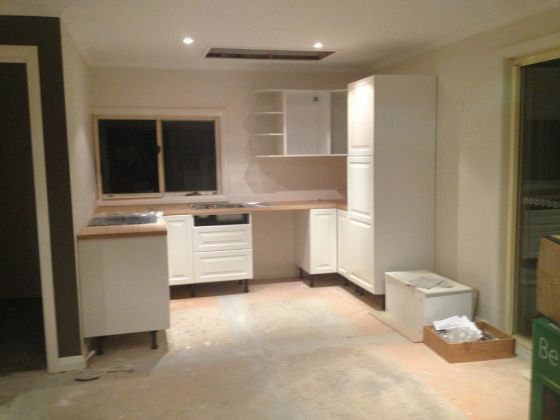
The Ikea kitchen being assembled.Photo 24-11-12 11 22 10 PM

9uGybQg6bydhVvr9j1LwuK5TV5pC6Z9cStbVeYicJUM

Floor boards down… wow! Almost all done!3Uu-yqomAmMFYSYqd-8P575v5PnZb0PkeyaBll8xRPg

These floating floors are called spotted gum and I just love the variation in the boards, great colours.20130717-095139.jpg

Next post I’ll show you how it looks now, all moved in and decorated.